Maintaining proper tire pressure is crucial for vehicle safety, fuel efficiency, and optimal tire performance. Properly inflated tires ensure better traction, handling, and braking, while also extending the lifespan of your tires. Ignoring tire pressure issues can lead to uneven wear, increased fuel consumption, and even accidents. If you’re dealing with a damaged valve stem, it’s essential to know how to inflate a tire with a broken valve stem: easy DIY guide to prevent further complications on the road.
One common but often overlooked problem that can affect tire pressure is a broken valve stem. The valve stem allows you to inflate and deflate the tire, and when it’s damaged, it can cause air leaks, leading to underinflated tires. Driving on underinflated tires poses a safety risk, as it reduces control over the vehicle and can lead to dangerous situations like blowouts.
In this blog, we’ll walk you through step-by-step instructions on how to fix and inflate a tire with a broken valve stem. We’ll also share practical tips for easy, do-it-yourself car care that can save you both time and money, keeping your tires in great shape.
Common Causes of Valve Stem Damage
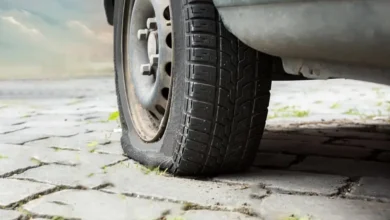
A broken valve stem can lead to dangerous tire deflation—repair it quickly to avoid costly damage.
Valve stems may seem like small, unassuming components of your tires, but they play a critical role in maintaining proper air pressure. Over time, various factors can lead to valve stem damage, which can result in air leaks and underinflation. Let’s explore some of the most common causes of valve stem damage.
1. Wear and Tear
Like many other car components, valve stems are subject to wear and tear from regular use. Every time you inflate or deflate your tire, the valve stem experiences stress. Over time, this repeated usage can weaken the rubber or metal parts, making the valve stem more susceptible to damage. This is particularly common in older tires that haven’t been replaced in years.
2. Exposure to Weather
Valve stems are constantly exposed to harsh weather conditions. Direct sunlight, extreme cold, and moisture can all cause the rubber material of the valve stem to degrade over time. UV rays from the sun can make the rubber brittle, while cold temperatures can cause cracking. Once the material begins to deteriorate, small air leaks may develop, causing your tires to lose pressure gradually.
3. Road Debris
Road conditions also play a role in valve stem damage. When driving over rough roads, gravel, or other debris, your tires can kick up small stones and objects that may impact the valve stem. This can cause small cracks or even knock the valve stem loose, leading to air leaks. In extreme cases, debris can puncture the valve stem entirely.
4. Aging
As your tires and their components age, the materials used in the valve stem naturally degrade. The rubber becomes less flexible and more prone to cracks, while the metal parts may corrode or rust. This aging process increases the likelihood of the valve stem breaking or leaking air.
5. Extreme Temperature Fluctuations
Frequent changes in temperature can also negatively impact valve stems. In areas where temperatures rise and fall drastically, the rubber in the valve stem expands and contracts. This constant movement weakens the stem over time, making it more prone to cracking or breaking. Additionally, the expansion and contraction of air inside the tire due to temperature changes can place extra pressure on the valve stem, causing small leaks.
Common Signs of a Damaged Valve Stem
- Slow air leaks: If you notice your tire slowly losing air even after inflating it, this could be a sign of a damaged valve stem.
- Visible cracks: Inspect your valve stem for visible signs of wear, such as cracks or brittleness in the rubber.
- Air bubbles: If you suspect a leak, apply soapy water to the valve stem and watch for bubbles. If bubbles form, air is escaping from the valve stem.
- Loose or bent valve stem: A valve stem that appears crooked or is easily moved may be damaged or loose, leading to air leaks.

Why Fixing a Broken Valve Stem Is Important
Driving with a broken valve stem might seem like a minor inconvenience at first, but ignoring this issue can lead to serious consequences. A damaged valve stem not only affects your tire’s ability to hold air but also compromises your vehicle’s safety, performance, and fuel efficiency. Let’s break down why addressing this problem promptly is so critical.
1. Risk of Rapid Tire Deflation and Blowouts
Timely repairs not only prevent blowouts but also improve overall tire performance and fuel efficiency.
A broken valve stem can cause air to leak from the tire at an unpredictable rate. In some cases, the leak might be slow, giving you time to fix the issue before significant tire pressure is lost. However, a severely damaged valve stem can result in rapid deflation, which can catch you off guard.
Rapid deflation, especially at high speeds, can lead to a dangerous blowout. When a tire blows out, it can cause you to lose control of your vehicle, leading to potentially severe accidents. This is particularly hazardous on highways or during long trips when stopping immediately isn’t always an option.
2. Compromised Tire Performance
Tires rely on consistent air pressure to perform at their best. A broken valve stem that leads to underinflation will directly affect your tire’s performance. Underinflated tires have reduced traction, making it harder to maintain control of your vehicle, especially during sharp turns or in wet conditions. Additionally, uneven tire pressure can cause premature wear on your tires, reducing their lifespan.
Properly inflated tires also ensure smoother rides and better handling. When the valve stem is compromised, you may experience a less comfortable ride, as the tires won’t respond as well to road conditions.
3. Decreased Fuel Efficiency
Underinflated tires, which often result from a broken valve stem, can have a significant impact on your vehicle’s fuel efficiency. Tires with low air pressure increase rolling resistance, meaning your engine has to work harder to move the vehicle forward. This extra strain results in higher fuel consumption. According to the U.S. Department of Energy, properly inflated tires can improve your gas mileage by up to 3%, saving you money in the long run.
Ignoring a damaged valve stem means you’ll be spending more on gas than necessary, which can add up quickly, especially if the problem goes unchecked.
4. Cost and Time Savings
Fixing a broken valve stem early on can save both time and money. If left unattended, what could have been a simple fix might lead to more severe damage to your tires, requiring costly repairs or even full tire replacements. Additionally, the longer you wait, the more likely you are to experience a blowout or other tire-related emergencies that could leave you stranded and in need of roadside assistance.
Addressing the issue as soon as you notice signs of damage, such as air leaks or visible cracks in the valve stem, can prevent these problems and keep your vehicle running smoothly. You’ll also avoid the hassle of dealing with sudden tire failures, saving time in the process.
Step-by-Step Guide to Inflate a Tire with a Broken Valve Stem
Replacing a valve stem is a simple DIY task with the right tools, saving you time and money.
When dealing with a broken valve stem, inflating your tire becomes tricky, but it’s manageable with the right approach and tools. This step-by-step guide will walk you through how to safely replace the damaged valve stem and inflate the tire, saving both time and money. Make sure you have all the necessary tools on hand before beginning the process.
Step 1: Gather Necessary Tools
Before starting, collect the following tools and supplies to ensure a smooth process:
- Jack: For lifting the vehicle off the ground.
- Lug wrench: To remove the lug nuts and take off the tire.
- Valve core tool: Used to remove the valve core from the valve stem.
- Pliers: To pull out the broken valve stem.
- Replacement valve stem: A new valve stem to replace the broken one.
- Air compressor or tire pump: To inflate the tire after valve replacement.
- Pry bar (optional): To help separate the tire bead from the rim if needed.
Step 2: Lift and Remove the Tire
Safety is crucial when working on your vehicle. Begin by using a jack to lift the car on the side with the damaged valve stem:
- Place the jack under the designated jack point on your vehicle and raise it until the tire is off the ground.
- Secure the car using a jack stand for extra safety.
- Use a lug wrench to loosen the lug nuts on the tire, then fully remove them.
- Carefully pull the tire off the wheel hub and set it aside in a safe spot.
Step 3: Deflate the Tire and Remove the Valve Core
Now that the tire is off the vehicle, it’s time to deflate it and remove the valve core:
- To release air pressure, use a valve core tool to unscrew and remove the valve core from the valve stem.
- Allow all the air to escape from the tire before moving on to the next step.
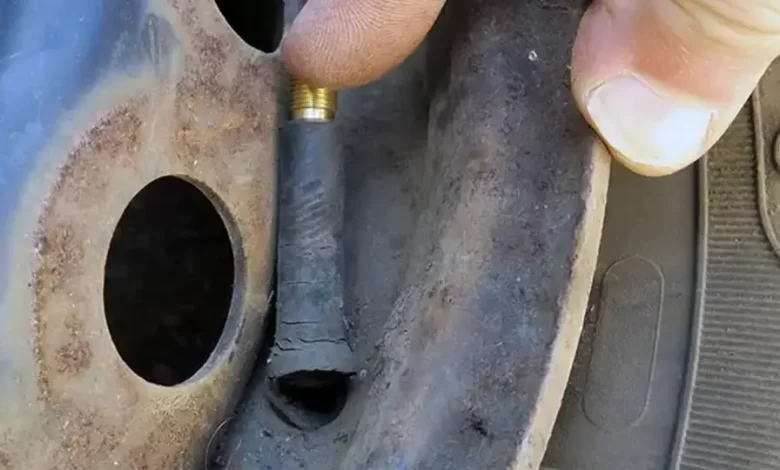
Step 4: Remove the Broken Valve Stem
Next, remove the faulty valve stem to make room for the replacement:
- Insert a pry bar or use pliers to create space between the tire’s bead and the rim, giving you access to the valve stem.
- Once the bead is separated, use pliers to grip the broken valve stem and pull it out of the tire.
- Ensure no debris falls into the tire hole during this process to prevent any future issues.
Step 5: Install the New Valve Stem
With the broken valve stem removed, it’s time to install the new one:
- Take the replacement valve stem and align it with the hole in the tire rim.
- Push the valve stem through the hole from the inside of the tire until it fits snugly in place.
- Use pliers to gently pull it into position, ensuring it’s firmly seated and airtight.
Step 6: Inflate the Tire
Once the new valve stem is installed, it’s time to inflate the tire:
- Attach your air compressor or tire pump to the valve stem. If using a gas station air dispenser, ensure a tight connection to avoid air leaks.
- Inflate the tire to the manufacturer’s recommended pressure level, typically found on the tire sidewall or inside the driver’s door panel.
- Check the pressure with a gauge to ensure it meets the required level, then remove the pump.
Step 7: Reattach and Secure the Tire
After inflating the tire, reattach it to your vehicle:
- Place the tire back onto the wheel hub and hand-tighten the lug nuts.
- Lower the vehicle using the jack until the tire touches the ground.
- Use the lug wrench to fully tighten the lug nuts in a crisscross pattern to ensure even pressure.
- Double-check the lug nuts to make sure they’re secure.
By following these steps, you can effectively replace a broken valve stem and inflate your tire, restoring your vehicle’s performance. Ready to move on to the next section?

Can You Replace a Valve Stem Without Removing the Tire?
Yes, it is possible to replace a valve stem without fully removing the tire from the rim. While the process is a bit more challenging, it can be done with the right tools and careful handling. This method is often preferred when you want to save time or when you don’t have the means to fully remove the tire.
How to Replace a Valve Stem Without Removing the Tire
Here’s a simplified approach to replacing the valve stem while keeping the tire on the rim:
Deflate the Tire Completely
-
- Start by using a valve core tool to remove the valve core from the damaged valve stem. This will release all the air from the tire.
- Make sure the tire is fully deflated before proceeding to avoid any accidental pressure release, which could be dangerous.
Loosen the Tire Bead
-
- The next step is to create enough space to access the valve stem without fully removing the tire. Use a pry bar or bead breaker to separate the tire bead from the rim at the location of the valve stem.
- Be gentle but firm, as you only need enough room to remove the valve stem, not to remove the whole tire.
Remove the Damaged Valve Stem
-
- With the bead slightly separated from the rim, use a pair of pliers to pull out the broken valve stem. Ensure that no debris or small particles enter the tire during this process.
Install the New Valve Stem
-
- Once the damaged valve stem is removed, align the new valve stem with the hole in the rim.
- Push the valve stem through from inside the rim until it’s firmly seated. Use pliers if necessary to pull it into place, ensuring a tight seal to prevent air leaks.
Reinflate the Tire
-
- After successfully replacing the valve stem, reinflate the tire to the manufacturer’s recommended pressure.
- Double-check the new valve stem for any leaks by applying a mixture of water and dish soap around the stem. If bubbles form, there may be a leak, and the valve stem will need to be adjusted.
Safety Tips for Partial Tire Removal
- Secure the vehicle: Ensure your vehicle is properly jacked up and supported before attempting to work on the tire.
- Carefully loosen the bead: Only loosen the bead around the valve stem area to avoid damaging the tire or rim.
- Use proper tools: Make sure you have the right tools, like a valve core tool, pry bar, and pliers, to prevent accidental damage to the tire or wheel.
By following this process, you can replace a valve stem without fully removing the tire, saving both time and effort. However, for beginners or those unsure of their mechanical skills, it’s always a good idea to seek professional help.
Valve Stem Replacement Tools and Techniques
Replacing a valve stem can be a straightforward task if you have the right tools and follow the proper steps. Here’s a breakdown of the essential tools needed and some techniques to ensure a smooth and leak-free replacement process.
Essential Tools for Valve Stem Replacement
To replace a valve stem efficiently, you’ll need the following tools:
- Valve Stem Tool – A specialized tool used to install or remove valve stems from the tire rim.
- Valve Core Tool – A small, inexpensive tool that allows you to remove or install the core of the valve stem to deflate or inflate the tire.
- Pliers – Useful for pulling out the old valve stem and installing the new one securely.
- Pry Bar or Bead Breaker – A tool used to break the tire bead from the rim, providing enough space to access the valve stem.
- Air Compressor – For reinflating the tire after the valve stem has been replaced.
- Replacement Valve Stem – The new valve stem that will replace the damaged one.
- Soapy Water Solution – Used to check for leaks after the valve stem has been replaced.
Checking for Leaks After Installation
Once you’ve installed the new valve stem, it’s crucial to ensure that it’s seated correctly and isn’t leaking air. Here’s a quick and effective method to check for leaks:
- Mix Water and Soap – Create a soapy water solution by mixing a few drops of dish soap with water in a spray bottle or bowl.
- Apply the Solution – After inflating the tire, apply the soapy water around the base of the new valve stem where it connects to the rim.
- Watch for Bubbles – If any bubbles form, it’s a sign that air is leaking. In this case, you may need to adjust the valve stem or reinstall it to create a tighter seal.
- Recheck After Adjustment – Once any necessary adjustments are made, apply the soapy solution again to ensure no further leaks.
Step-by-Step Instructions for Replacing Valve Stems Without Removing the Tire
Here’s a step-by-step guide on how to replace a valve stem without fully removing the tire from the rim:
- Deflate the Tire Completely
- Use the valve core tool to remove the valve core and allow all air to escape from the tire. This will make it easier to work with and prevent any dangerous pressure buildup.
- Loosen the Tire Bead
- Using a pry bar or bead breaker, carefully loosen the tire bead around the area where the valve stem is located. This step creates enough space to access the valve stem without removing the entire tire from the rim.
- Remove the Damaged Valve Stem
- With the bead loosened, use pliers to grip the broken valve stem and pull it out of the rim. Be careful not to drop any debris into the tire during this process.
- Install the New Valve Stem
- Insert the new valve stem into the hole in the rim. Use pliers to pull the stem through until it’s properly seated, ensuring a snug fit to prevent air leaks.
- Reinflate the Tire
- After replacing the valve stem, use an air compressor to inflate the tire to the manufacturer’s recommended pressure. It’s important to check for any leaks before considering the job complete.
- Check for Leaks
- After the tire is inflated, use the soapy water solution around the valve stem to check for any signs of leaking air. If no bubbles form, your new valve stem is installed correctly and the tire is ready for use.
By using the right tools and following these techniques, you can replace a damaged valve stem without needing to fully remove the tire. This approach is ideal for saving time and avoiding the hassle of completely dismounting the tire from the rim.
Frequently Asked Questions (FAQs)
Here are some commonly asked questions and their answers related to valve stems, tire inflation, and general tire care to help readers further understand the importance of maintaining valve stems and how to deal with related issues.
- How much does it cost to replace a valve stem?
The cost of replacing a valve stem typically ranges between $5 and $30 per tire at most tire shops or service stations, depending on the complexity of the valve stem and any additional labor. For a DIY method, you can purchase a replacement valve stem and tools for around $5 to $10.
- Does a missing valve cap cause air leaks?
No, a missing valve cap does not directly cause air leaks. The valve cap primarily protects the valve stem from debris, dirt, and moisture, which could eventually damage the valve if left unprotected.
- What happens if a valve stem is damaged while driving?
Driving with a damaged valve stem can lead to slow or rapid air loss, increasing the risk of a tire blowout or complete deflation. This can compromise your vehicle’s handling and safety, particularly at high speeds.
- Can you replace a valve stem without removing the tire?
Yes, it is possible to replace a valve stem without removing the entire tire from the rim. The process involves deflating the tire and loosening the bead to access the valve stem, making it a more efficient option for quick repairs.
- How often should valve stems be replaced?
It’s recommended to replace valve stems every 5 to 6 years or whenever you’re getting new tires installed, as they tend to wear out over time due to exposure to the elements.
- Can a damaged valve stem cause tire pressure monitoring system (TPMS) issues?
Yes, if your vehicle is equipped with TPMS, a damaged valve stem can cause incorrect readings or trigger the TPMS warning light, as it may lead to air leaks that affect tire pressure levels.
- Is it safe to drive long distances with a leaking valve stem?
No, it is not safe to drive long distances with a leaking valve stem. Even slow air leaks can lead to underinflated tires, reducing fuel efficiency, increasing tire wear, and posing a safety hazard.
- How do I know if my valve stem is leaking?
One way to check for a leaking valve stem is to apply a soapy water solution to the valve area. If bubbles form, this indicates air is escaping from the valve stem and it may need replacement.
- Can extreme weather affect my valve stems?
Yes, extreme temperature fluctuations, both hot and cold, can cause cracking or weakening of valve stems over time. Heat can make rubber components brittle, while cold temperatures can cause rubber to contract, increasing the chances of air leaks.
- Are valve stem caps universal?
Most valve stem caps are universal and fit all standard tire valves. However, certain specialty or high-performance vehicles may have specific valve caps designed for their valve stems.
- Can over-tightening the valve core cause damage?
Yes, over-tightening the valve core can damage the threads inside the valve stem, leading to air leaks. Always use a valve core tool and ensure a snug fit without excessive force.
- What is the purpose of a valve stem core?
The valve stem core is a small pin inside the valve that regulates airflow into and out of the tire. It helps maintain air pressure by sealing the tire when no air is being added or released.
- Do valve stems need to be replaced when installing new tires?
It is highly recommended to replace the valve stems when installing new tires. Old valve stems may have wear and tear, making them more prone to leaking. Many tire shops include this service in the installation package.
- Can you drive with a broken valve stem?
It is not recommended to drive with a broken valve stem, as it can cause your tire to lose air rapidly, increasing the risk of a tire blowout and endangering your safety on the road.
Conclusion
Maintaining your vehicle’s tires by addressing issues like a damaged valve stem is crucial for both safety and performance. A broken valve stem can lead to rapid air loss, reduced fuel efficiency, and even dangerous blowouts if left unchecked. That’s why it’s essential to fix the problem as soon as you notice it.
Taking quick action on valve stem issues keeps your vehicle safe and ensures optimal tire health
Simple DIY solutions, like replacing a valve stem, can be easily done at home with the right tools and a bit of patience. By following proper safety procedures and the steps outlined in this guide, you can save both time and money. However, if the issue seems more complicated or you feel unsure, don’t hesitate to visit a professional mechanic to ensure the repair is done correctly.
Ultimately, timely repairs not only help you avoid costly damage but also ensure that your vehicle remains safe and efficient on the road. Taking care of these small issues now will provide peace of mind and keep your tires in top condition for all your travels.